
DIY Polycarbonate Skylights For Tall Skoolie People

We can’t say that we are the geniuses who came up with the idea to install polycarbonate skylights on the shoulders of our bus, but we are thrilled with how they turned out.
Throughout this article, we are going to share why on earth we decided to cut six big holes in our skoolie roof, why we chose polycarbonate over plexiglass and our process for creating & installing these curvey skoolie skylights.
These polycarbonate skylights were created for tall skoolie people who aren’t doing a roof-raise but want to optimize daylight & expand the feeling of size in their school bus conversion.
Jump To:
- [VIDEO] 3-Part Series: DIY Skylights For Tall People
- Why we cut six big holes in our skoolie roof…
- How were we going to pull off custom skylights on the curved shoulder of the bus?
- What kind of glass is best suited for skylights on a bus?
- Cutting six holes in our metal Skoolie roof
- Yet another challenge arose with our custom skylights
- Creating the curvy wooden frames for our polycarbonate skylights
- What if the skylight frames were shelves as well?
- Time to install our roof windows
- To sum up our polycarbonate skylight experience…
Not a reader? Watch this 3-Part Series on YouTube!
Part 1
Part 2
Part 3
Why we cut six big holes in our skoolie roof…
You know when you have an idea that you are so excited about, but your family doesn’t quite get the appeal?
Even after we bought our school bus, I still felt I had to justify why on earth we would want to live in it. So we turned to Netflix for some help. As we watched the film “Expedition Happiness” with my parents, they seemed to warm up to the idea of us living in a tiny home on wheels and thought it would be an adventure, but something still puzzled my dad.
He turned to Brian and said, “You’re going to hate me for this, but how are you going to see out while you are standing inside the bus? You’re going to be looking straight into the ceiling while you do everything. Imagine doing dishes looking at the ceiling. You will be enjoying the ceiling, while Erin is enjoying the view. What if you installed some curved skylights along the shoulder of the bus above your kitchen area?”
Our jaws dropped.
My dad was right. Sure he just planted a seed that created a lot more work for us, but it was just in the nick of time. We had just finished framing out our new windows, skinning the exterior where we won’t be having windows, and we hadn’t spray foamed yet.
How were we going to pull off custom skylights on the curved shoulder of the bus?
This idea consumed our thoughts, especially Brian’s, after it was planted in his mind, it was like an obsession. Standing in at 6’2″, his eyes rest directly at the curve of the ceiling inside the bus.
Though I knew this was going to be a big job, and it would delay us from getting to the interior, I started to feel for him. We didn’t have the time, skillset, or budget to pull off a roof raise. PLUS, our bus is already 40 feet long, and almost 11 feet high. It’s already enormous, did we really want to make it any bigger? Besides, the bus hardly fit into the barn we are converting it in. Since we have been converting the bus during the Canadian Winter, a roof raise was definitely out of the question if we wanted to do our build in a sheltered area.
Installing these shoulder skylights seemed like the only solution for my big tall man, and he wanted them big time. So much so, that he started drawing out the plans and researching what material could make the bend.
What kind of glass is best suited for skylights on a bus?
When we revamped our emergency exits and turned them into skylights, we did a lot of research on what material would work best. Vehicle glass was an option, but with the hatch opening & closing, we didn’t want to risk the glass breaking due to high traffic.
Research showed that plexiglass is more likely to scratch, crack, spider, chip, and get damaged by hail. We needed something resistant to the impact of hail and possible rocks.
It turns out, that polycarbonate can handle a 9mm bullet (not that we plan on coming across that kind of a situation.)
Polycarbonate was perfect for our first DIY skylight project. Most people call this stuff Lexan, which is just a brand name. It turns out we couldn’t get Lexan here in Ontario. We ended up finding a Canadian polycarbonate supplier and gave it a shot on our emergency hatch skylights. After our first polycarbonate experience was a success, it made us wonder if it would work for the bend of the school bus roof?
Brian gave Canadian Industrial Plastics a call to see if they had anything that could handle the curve of the roof. After explaining our project, they recommended we go with the 1/8″ polycarbonate because it has a cold bend radius of 12.5 inches. That is bananas. Being in the middle of winter here in Ontario, we were so excited to hear we wouldn’t have to try and figure out how to heat the polycarbonate before installing it on our roof.
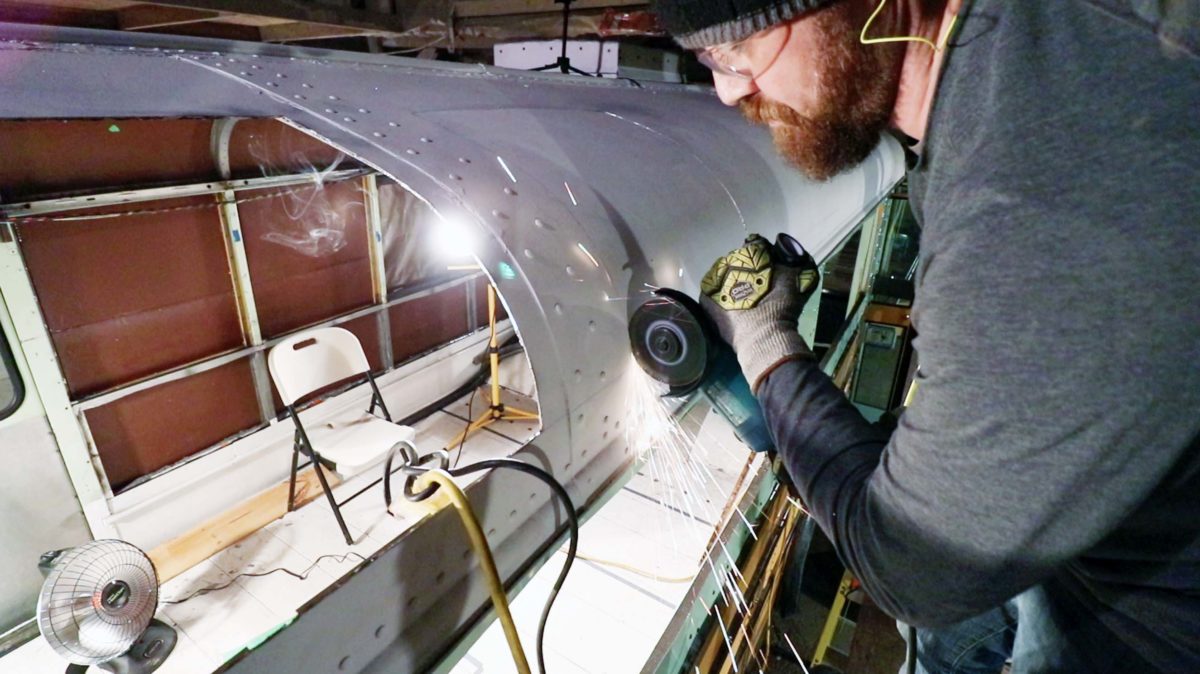
Cutting six holes in our metal skoolie roof
This was quite literally the scariest part of the whole DIY skylight operation to be honest with you.
First off, it was pretty scary walking on a plank of wood held between two ladders, and filming Brian cut the holes.
Second, we cut 6 big holes in our roof!
Third, how can we make them leakproof?!
Brian wasn’t scared, though. He is a man on a mission. After fantasizing about standing tall while doing dishes with a mountain view nothing was going to stop him.
Yet another challenge arose with our custom skylights
Relived that the polycarbonate could make the bend, we decided to go for it, but that wasn’t the end of the challenges. Next, we had to figure out how we were going to screw the panels onto the bus. Sure we could just screw the polycarbonate into the metal roof, but that didn’t seem like a long-lasting solution. Over time the screws could naturally back out of the thin metal, causing a whole array of problems. Plus, what would the skylights look like from the inside of the bus?
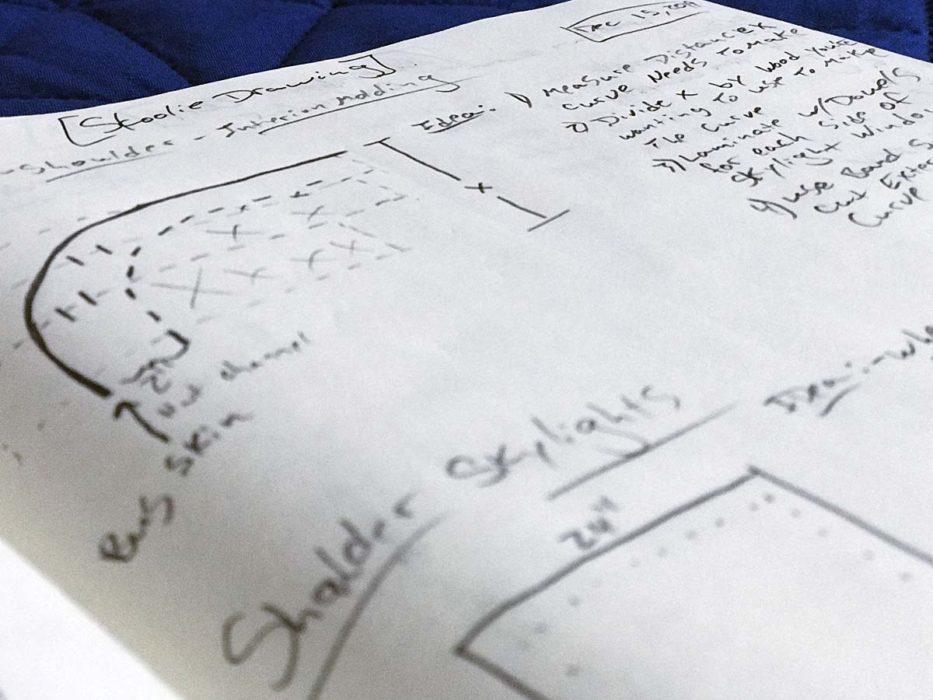
We needed to design a frame that fits snug into the curve of the bus. It had to be something sturdy and attractive from the inside.
Thank goodness for Brian being absolutely relentless. He designed a wooden frame that would fit perfectly into the shoulder of the bus.
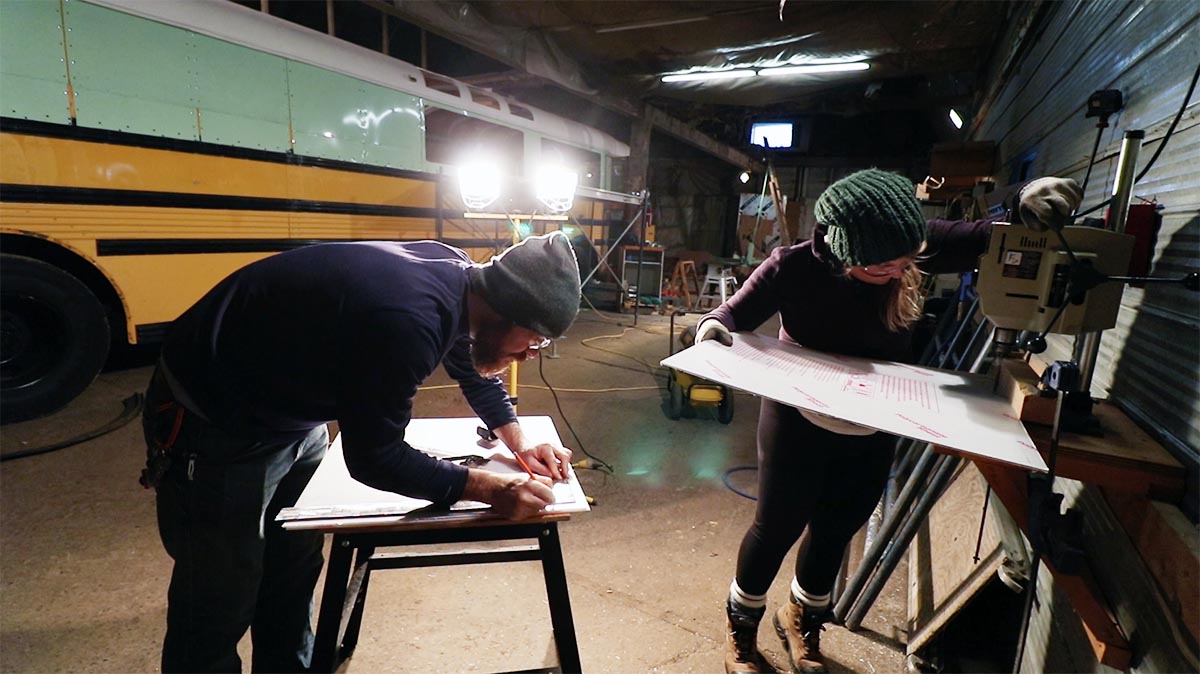
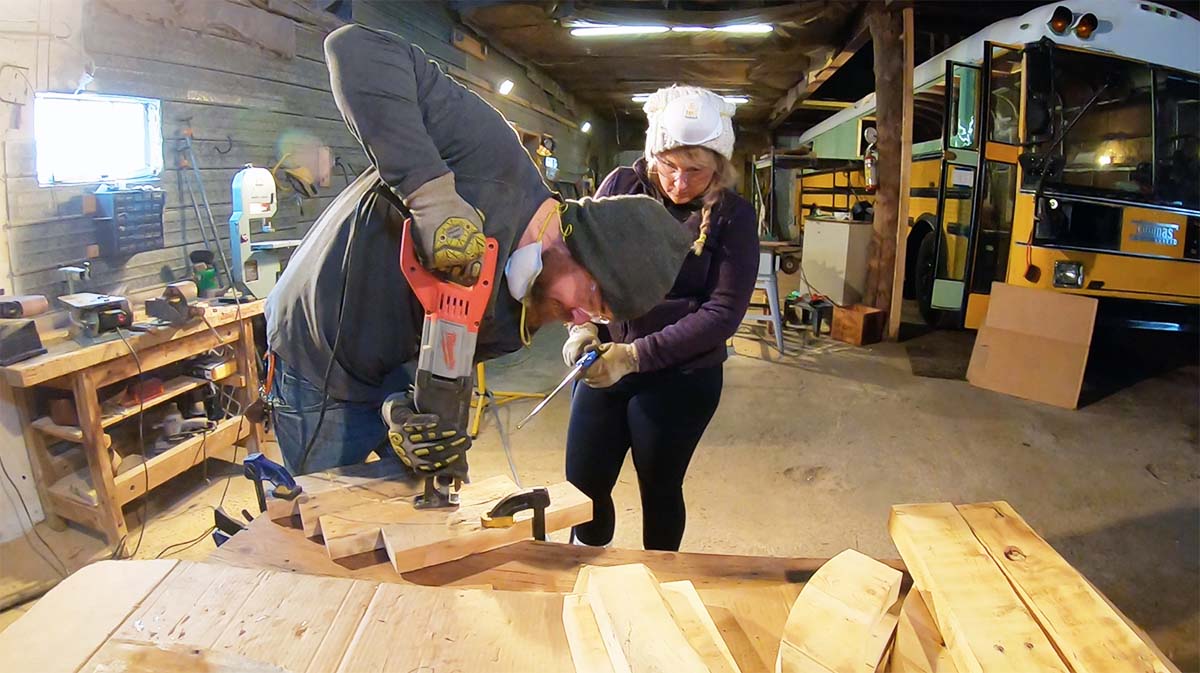
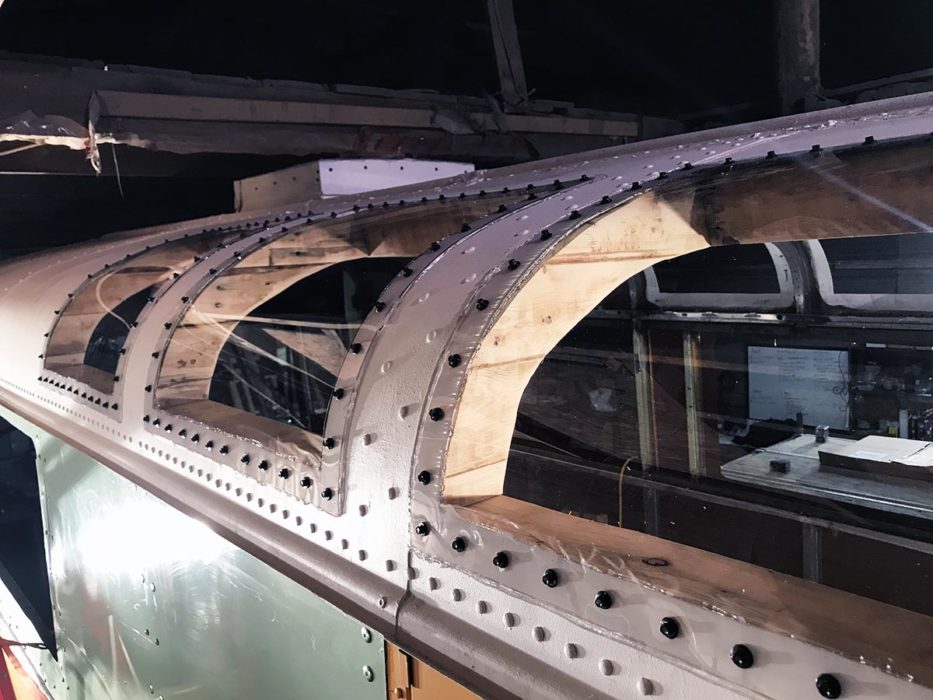
Creating the curvy wooden frames for our polycarbonate skylights
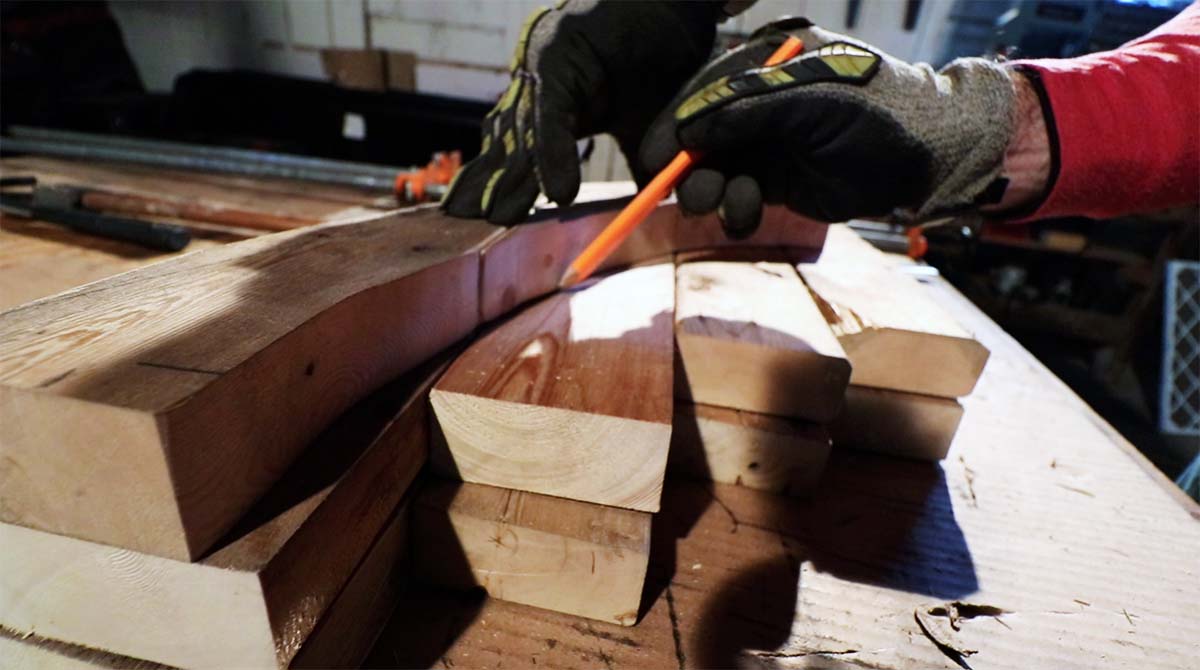
The top & bottom of the frame wasn’t the challenge. It was the sides. Each skylight consists of two curved pieces. The curved pieces Brian designed are made of four pieces of wood glued & fit together with dowels in the shape of a staircase.
Once the glue set, we traced the curve of the bus onto the wood and measured a parallel curve (think half of a rainbow.)
We had big hopes that our ancient bandsaw would cut the curves smoothly. When it worked, it worked great, but the motor is dying on it so it kept turning off as we cut. So we tried the old hand-me-down scroll saw, which also gave us problems. Our last hope was the Sawzall. Thank goodness it worked!
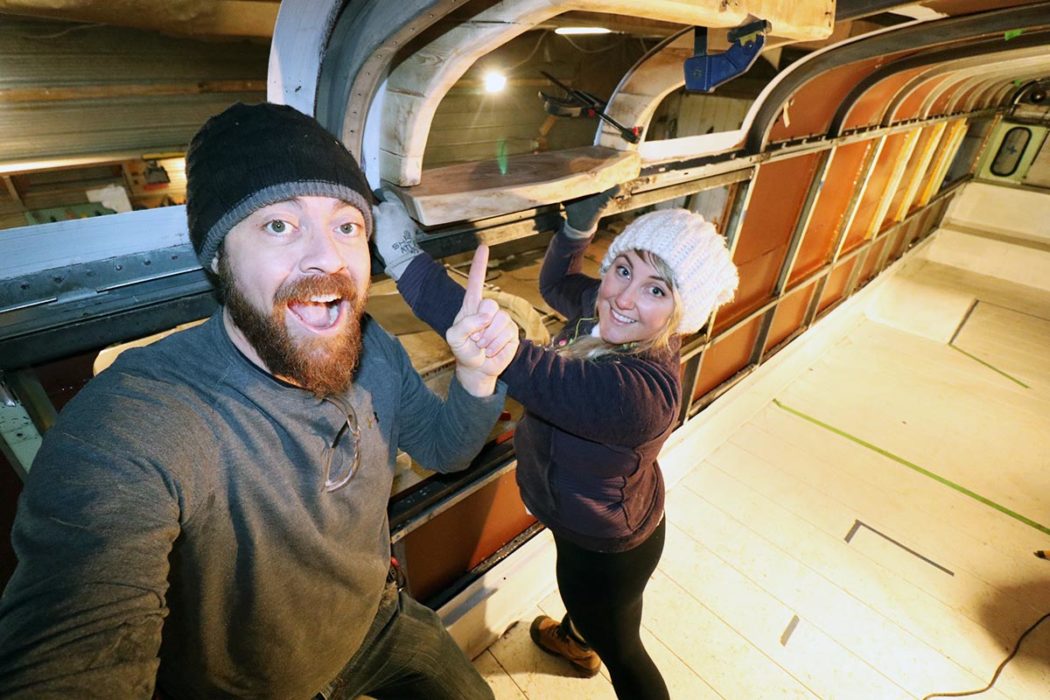
What if the skylight frames were shelves as well?
I couldn’t help but add shelves into the mix! The frames were looking fantastic, but wouldn’t they look even better if they had a live edge shelf? Ummm YESSS!
Luckily, we sourced some local live edge walnut and got to sanding the chainsaw marks out of them right away.
Speaking of a sanding party, we routed and sanded those skylight frames & shelves for days. Then we glued & screwed them together.
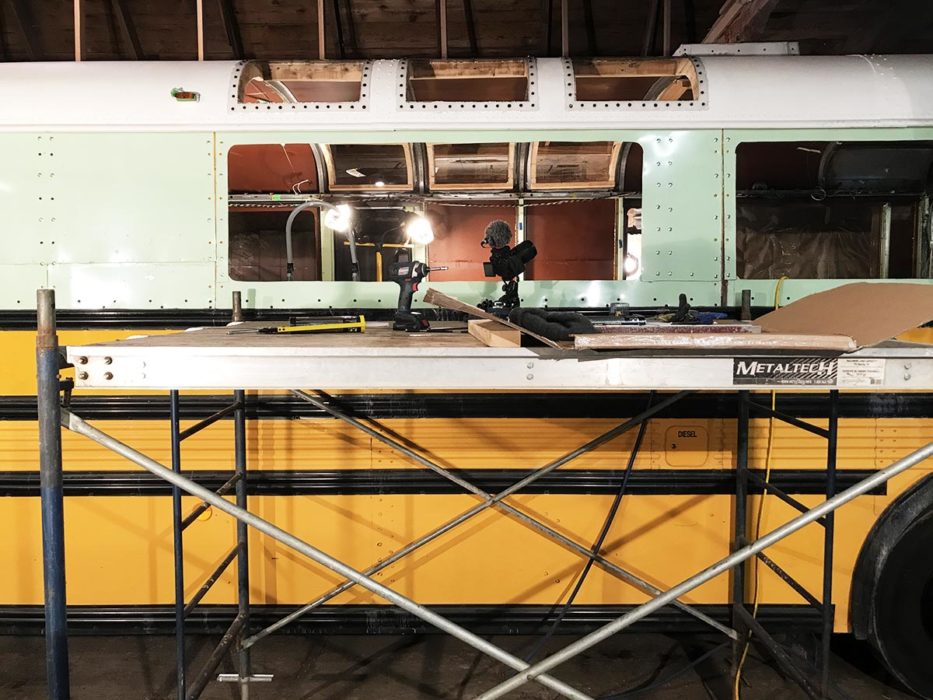
Time to install our roof windows
The moment we had been waiting for. We were on the edge of our seats the night before as we discussed how we were going to pull this off. To our surprise, everything went really smoothly.
Order of operations for installing polycarbonate skylights:
- Cut polycarbonate to size (if needed, we bought ours already cut to size)
- Measure then pre-drill holes in polycarbonate with a cobalt bit
- Measure down from the edge of the hole in your roof for placement of the bottom edge of polycarbonate, and mark with a pencil
- Place the polycarbonate on the markings
- Using a pencil place dots in the middle on all the holes along the bottom edge of the polycarbonate
- Remove polycarbonate
- Pre-drill the holes for the bottom edge into the metal roof
- Line up the polycarbonate with the holes, and screw in the bottom two corners, and the center using roofing screws with metal & rubber washers
- Bend the polycarbonate over the curve of the bus, and trace the rest of the holes onto the roof of the bus
- Remove screws and take the polycarbonate down
- Pre-drill all of the holes into the metal
- Hold the frame up to the hole from the inside of the bus, make sure it is level & aligned with the opening then clamp it into place
- Pre-drill the corner holes into the wood first, then secure the 4 corners with screws
- Then you can remove the clamps & drill all of the other pilot holes into the wood
- Take the screws out of the wood frame
- Squeeze construction adhesive onto the ceiling side of the frame
- Squeeze clear polyurethane caulking onto the roof
- One person lines up the frame to the hole and holds
- Screw all 4 corners of the frame to the bus
- Remove one bottom screw at a time, and screw polycarbonate onto the bus
- One person gently pushes the polycarbonate onto the curve of the bus
- The other person screws on the polycarbonate
- Once all of the screws are in, you will notice the polyurethane spreads nicely
- We did one final bead around the edge of the polycarbonate for a good weather seal against the roof of the bus

I know this seems like a lot, but if you do it in steps, it is much easier. This is definitely a two-person job. Some steps may seem redundant, but we found this was the best way to keep the frame in place while we were marking holes and drilling pilot holes as well.
To sum up our polycarbonate skylight experience…
We are beyond thrilled with how these skylights turned out. At this point, we haven’t gotten to see them in all their glory with sunlight beaming and mountain tops peering through them, but we can imagine it will be spectacular.
Our DIY skylight project was definitely a rewarding one. We learned so much together, and each got to bring our strengths to this project.
Working with one-eighth inch polycarbonate was a breeze. It bent around the curvey shoulder of the bus rooftop perfectly. We can’t think of a more perfect material to use for roof skylights. Another thing we were super happy about, was using reclaimed wood. Giving that wood a new homemade us feel awesome, and you really can’t beat the character.
Sure, there was a lot of math, and adjustments that needed to be made to fit the curve of the bus, but that is all a part of the skoolie experiment, isn’t it? That is why this is becoming a movement! People want to live more smart & simply so they can do more of what they love. They want to put their stamp on their home and create a living space that works for their individual needs.
Let’s be the generation of people who care less about consuming and more about making the best of what we have. Breathe life into what’s old and give it a new home.
Want the complete detailed plans for this build? Get the guide »

Love within, love around... Adventure On!
- Erin Nicole Bick

Hey, we're Brian + Erin. Currently, we're workin' on our bug out bus. Lucky the proverbial $hit hadn't hit the fan yet when we picked up this 40-foot beauty in Phoenix AZ and drove it up to Canada to convert it. Hopefully, we all still have time...
Honestly, this bus conversion has been the only sane thing in this insane world lately. We can't tell you how good it feels to BE working on something that lights our souls up and has such potential for a life that is entwined with nature, love, and happiness.
Our main goal is to inspire people to get off-grid and become self-reliant. We are well on our way and are super excited to talk about solutions with others who are shooting for a similar way of living.
Did This Blog Post Help You? If so, we would greatly appreciate it if you comment below and share it with a friend.
2 Comments

Check out our must-read articles about Skoolie Conversion
Texas Couple Accidentally Won School Bus Auction | Registering & Building A Skoolie In DFW
Joeseph & Jennifer Davis from DFW, Texas accidentally won an online auction to buy a school...
DIY Skoolie Solar System To BE Off-Grid Longer
When designing & building a DIY skoolie solar system, there are quite a few considerations....
Steps To Import A Bus From The USA To Canada (Or Vice Versa)
Yvan & Sylvie from Québec have successfully imported not just one, but TWO buses from the USA...
Hey. Cool idea. I remember seeing a couple do this on youtube a while back. I did something very similar on my roof skylight. The main exception was that my see through panel is acrylic rather than polycarbonate. After a -20° (fahrenheight) night, the acrylic cracked in multiple places. I glued it back together to keep things dry, but it looks like shit.
All this to say, I need to replace it. How are your polycarb panels holding up? Any noticeable UV damage? UV rays were the main reason I went for acrylic. It’s supposed to be more durable in that way. Cheers
Hey there Carey, Great question. We chose polycarbonate because it is the same stuff that bullet proof glass is made of. We thought that if it can handle a bullet, then hail shouldn’t be a problem. After having these installed and outside for almost a year now, there is no signs of UV damage and we have had several hail storms with zero cracks. Supposedly polycarbonate that is not treated with a UV protectant will yellow over time. We’re keeping an eye on it to see how long that takes (if ever). Happy building! – Brian + Erin